Why 'My Mink Betty'?

Why 'My Mink Betty'?
I'm not your common, everyday twenty-something year old and when I graduated from High School I got an equally uncommon gift. My parents found for me a beautiful 1940's mink stole at a garage sale. It had belonged to the woman's Great Aunt Betty who had married late in life to a man with money and had only allowed him to buy her this one luxury. The unusually styled stole has the name, Betty L. Jones, embroidered in the satin lining so that's what I call her. They never had children of their own and the mink was passed to Aunt Betty's niece and on to her daughter. Until it got to me, no one since Aunt Betty had worn it. Now Betty the mink and I go to the theater together on special occasions and I hope that someday I can take her to the Symphony or the Ballet. Although Betty hadn't been worn or loved for many years she was waiting for someone to love her again as are most other things I look for when thrifting.

Showing posts with label Ravelry. Show all posts

Tuesday, May 5, 2015

Ravelry Swap Reveal: Part Three

This is Part Three of the Ravelry Swap Reveal.
Part One can be found here
Part Two can be found here.

I've already shown you the yarn and fabric related items I sent in my swap.  
Remember the theme was "Reduce, Reuse, Recycle,"
 

so I thrifted this Pyrex mug in the Terra pattern.  I chose it because of the orange and brown color, and because of it's unique shape.  Unlike most Pyrex mugs, this one is very thick, has no handle, and holds a generous 13 ounces.  Besides being a mug, it makes a great pencil holder, or a pot for a plant.  Plus, it's sturdy enough to ship easily.


I also sent a selection of my storybook envelopes and blank cards.


I found out my swappee likes Star Wars, so I cut up some old Scholastic story books based on the original trio of movies.


Then I added some Disney and Sponge Bob, including extras because she has kids.


And I made some new ones from a book I picked up at the Goodwill Outlet.


It's full of these really cool satellite photos


printed on nice, glossy paper.  Isn't the color distribution lovely?

She's also a Harry Potter fan, so I went in search of something to use as the cover for a notebook.


I found this paperback book at the Salvation Army Family Store for $1.00.  I just love the graphics.


I peeled the cover off and trimmed it down to make a front and back cover for the notebook, and kept the spine for a bookmark.  Then I went looking for something to use to stiffen up the cover.  I found two pieces of Grafix medium weight chipboard left over from a project I did a few years ago, that were just the right size.


I tested a scrap of the chipboard first with my bind-it all machine and it punched right through it, so I thought I was all set.  I had no idea what I was getting myself into.  I selected a nice piece of scrapbook paper to use for the interior lining of the cover, and used spray adhesive to glue the book cover pieces to one side of the chipboard and the scrapbook pieces to the other side.  Now all I had to do was trim down the edges to make the covers.  
One problem.  Nothing I had would cut through the chipboard.  I thought I remembered using scissors before.  Apparently not, because they wouldn't do it.  I don't know what I used before, maybe black magic, witchcraft and trickery.  I tried the Exact-o knife.  No dice.  I tried a linoleum knife.  No way.  I started calling friends and finally found a Fiskars rotary paper trimmer to borrow, and even it had a tough time cutting the chipboard.  I had to do ten passes with the trimmer to cut all the way through, but I finally got it. 

Then I saw it.  The spray adhesive was loosening up.  Aarrgh!  So I very carefully peeled back the paper in sections, painted a layer of white glue, rolled a rolling pin over it to get out any excess glue, and pressed it under a stack of books.  Then I repeated this procedure for the other three faces.  It was quite a learning process, but I finally had my front and back cover ready to be punched and assembled.

And what did I learn?
                      
                       1.  Chipboard is a pain in the asterisk.
                       2.  Chipboard is a pain...
                       3.  Spray adhesive isn't as strong as one might think.
                       4.  I really should build that book press I've been thinking about.
                       5.  Sometimes the ends do justify the means


Here's the finished notebook.  It was kind of a pain to put together, but it was definitely worth it.  I really like the way it turned out.


The inside of the front and back covers are lined with blue/pink/purple "spray dyed" scrapbook paper, and it is filled with sheets of blank paper.  The back of the bookmark was covered in orange card stock (this time spray adhesive worked).


Here's the back cover.

I had one other item to fit into the box.
I bought a bag of children's books at the Goodwill Outlet some weeks before the swap - 12/$1.00.
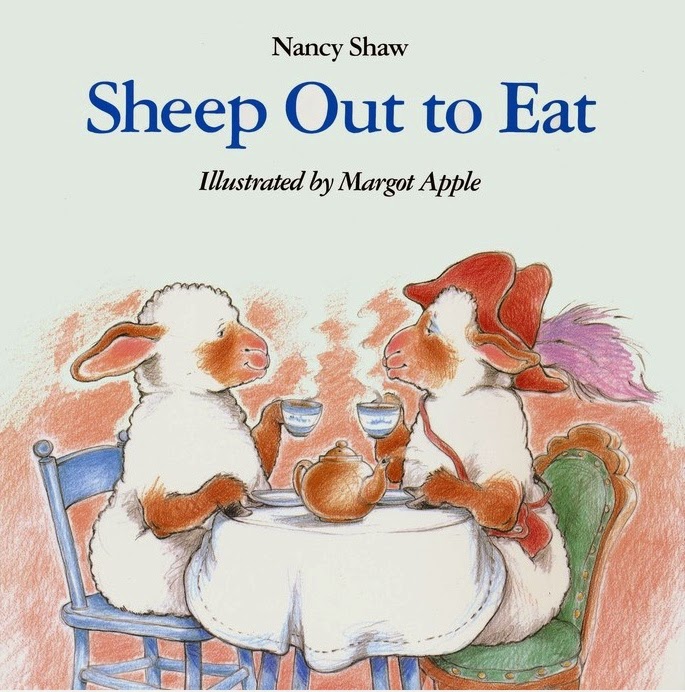

This cute little story is about a group of sheep who visit an English Tea House, cause trouble, as you can imagine, and end up lunching on the lawn by munching on the lawn.  I thought it was especially appropriate since I was sending wool, and it was Easter time.

And that's the end of the reveal.  I stuffed everything into a USPS Priority Mail Flat Rate Box and sent it off to Texas.  My swappee was very appreciative with her kind "Thank You"s.

I really enjoyed doing this swap, but I'm glad it's finally done.  I hope you all enjoyed seeing it.

I'm linking up with these parties:
Show and Share

Saturday, April 25, 2015

Ravelry Swap Reveal: Part Two, The Project Bag

I live close enough to one of the two Pendleton Woolen Mills (where Pendleton blankets and shirts are born) that I have driven past it countless times over the years on my way to church, friends' houses or estate sales.  For years I've wondered whether there was a factory store open to the public and what the hours would be.  One day, on my way to church, God sent me a sign.  Well actually, it was the factory sign that had apparently been there all along, just obscured by a grove of cottonwood trees.  Somebody cut down the trees, and I discovered the Mill Store.


Soon I stopped in and discovered that a decent variety of wool remnants could be found at reasonable prices.  Additionally, every cut fabric was 30% off, including remnants.  I wanted to do a project bag for the Ravelry swap, and after a very enjoyable time looking through all the goodies, I found three pieces I was sure would work.


I chose a solid piece in orange, and two coordinating plaids, one with a grey base, and one with a yellow base.  Each remnant was about a half yard of fabric.

I knew I wanted to make a Japanese Knot style bag, because this was going to be my first project ever sewn on a machine, and it doesn't require a zipper, drawstring or any other fastenings.  I found a pattern online and modified it to the size I wanted.  Then I set to work.

Unfortunately, being a novice at sewing, I didn't realize that working with wool brings it's own challenges.  The edges needed to be finished so they wouldn't ravel, and the weight of the fabric made it more difficult to manipulate and gather.  I also did not know that a Japanese Knot bag is a tricky pattern, no matter how straight forward it may seem.  Mom was confined to bed, so unable to help beyond giving advice, so I was on my own.  It was quite an adventure.   But I managed to pull it together just in time for shipping.


Here's the finished object.  I used the solid orange with the grey plaid for contrast. 


The lining is done in the grey plaid with an orange bottom, and the bag is fully reversible.  Even though the wool was a challenge for a novice to work with, it makes for a very sturdy bag, and I'm very pleased with the choice.  My swappee sews and she was very impressed.  Because she sews, I sent along the leftover material, including the majority of the yellow and orange plaid.


When I was practicing with the sewing machine, I made this little needle book, which I also sent.  Wool makes an excellent needle book.  Now that the sewing machine is set up again, maybe I can sew a make-up bag in less than 24 hours (sewing by hand isn't difficult, but it is time-consuming, lol).

Part Three of the Ravelry Swap Reveal is coming soon.
If you haven't seen Part One, it was mostly yarn.

I'm linking up with these parties:
Nifty Thrifty Sunday
Show and Share
Roses of Inspiration
Think Tank Thursday
Frugal Friday

Sunday, April 19, 2015

Ravelry Swap Reveal: Part One

For my crochet projects, I use Ravelry, a networking site for fiber arts, where one can find patterns for free or purchase, pattern help and yarn or notions venders.  They have a wide network of social forums and groups.  I am a member of a group specifically for swapping, and I just completed a swap. 

The theme for this swap was "Reduce, Reuse, Recycle."  This fit so well with things I like to do, such as thrifting, repurposing, and crafting, that I was able to fill a large Priority Mail flat rate box and stay well within my budget.  

 One of the requirements for the swaps that I do is to include at least one skein of yarn for my swappee to use.  I also like to send one item that I crocheted.  Mom likes to unravel or dismantle sweaters, and I help, so between the two of us, we were able to compile a good amount of yarn for this swap.
 

This 25c wool/angora/nylon J. Crew sweater


became a pair of fingerless mittens

and a lot of bulky weight yarn for my swappee to craft with.


The color in my picture is a little off; the yarn itself is a bit more mustard yellow.

I'm always on the lookout for a good white wool sweater that can be unraveled and dyed. 


So I pulled this one from my stash.  This was a 2XL woman's sweater, wool/nylon blend, that I picked up at Value Village for about $3.50.


First, Mom took out the seams, then she unraveled the sweater, resulting in about 2000 yards of sport weight yarn.


I used felted joins to make two skeins, 455 yards each, and then dyed them using Wilton Gel Color and vinegar to get a nice variegated orange colorway.  My swappee's favorite color is orange.  You can see I still have a little more than half the yarn left for another project. 

We learned how to unravel sweaters and reclaim the yarn from THIS website.


I've been cannibalizing jewelry for years, so I was able to put together a row counter bracelet and some stitch markers.  And there are the Tupperware measuring spoons I found back in February. 

These are just some of the things I was able to get into my swap box.  I'll show more soon.

I'm linking up with these parties:

Nifty Thrifty Sunday
Show and Share
Roses of Inspiration
Think Tank Thursday
Frugal Friday
Tips & Tricks
Bouquet of Talent
Related Posts Plugin for WordPress, Blogger...